The Castles of Burgundy
 Käytä noppiasi rakentaaksesi asutusta, voimakkaita linnoja, käydäksesi kauppaa jokea pitkin, perustaaksesi hopeakaivoksia ja käyttääksesi matkailijoiden tietoa.
Saat pisteitä kasvattamalla eläimiä, täyttämällä alueita, myymällä tavaroita ja useilla muilla tavoilla.
Mutta pelaa viisaasti, jotta voit käyttää noppiasi tuli mikä numero tahansa. Muuten joudut käyttämään työläisiä... jos niitä vielä on!
Pelaajien lukumäärä: 2 - 4
Pelin kesto: 32 mn
Monimutkaisuus: 3 / 5
Pelaa The Castles of Burgundy ja 1330 muuta peliä netissä.
Latausta ei tarvita - pelaa suoraan selaimellasi.
Ystäviesi ja tuhansien pelaajien kanssa ympäri maailmaa.
Ilmaiseksi.

Pelaa The Castles of Burgundy ja 1330 muuta peliä netissä.
Latausta ei tarvita - pelaa suoraan selaimellasi.
Ystäviesi ja tuhansien pelaajien kanssa ympäri maailmaa.
Ilmaiseksi.
Sääntöyhteenveto
Phases and Rounds
Each game consists of 5 phases (A, B, C, D, and E). Each phase consists of 5 rounds. During each round, the white die is rolled. The number determines which numbered depot the top good is placed in. Then each player takes a turn, carrying out two actions, one with each of their dice.
Actions
The two actions a player may perform are associated with each rolled die. The action is associated with the number shown on the die.
You may buy a tile from the central board at any time (provided you have sufficient funds).
To perform an action, first select the die, then do one of the following:
| Click on a tile from the numbered depot that matches the selected die to add it to your inventory. | 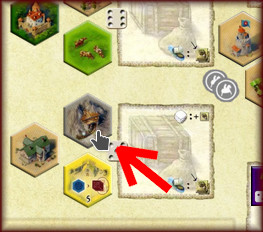 |
| Click on a tile in your inventory to place it on the player board. The tile must match the selected die and the color of the tile and be adjacent to a previously placed tile. |  |
| Click on a good(s) matching the selected die to sell it for 1 Silverling and 2, 3, or 4 victory points (depending on number of players). |  |
| Click on the worker icon on your player board to add 2 workers to your supply. | 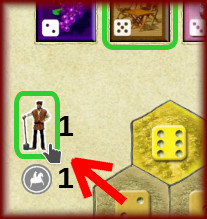 |
Workers can be used to increase or decrease the number of the selected die. The Display workers needed user preference can be used to display how many workers are needed to perform an action.
Display
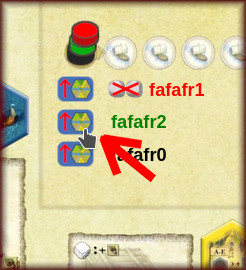 You can click on the button next to a player's name (under the order track discs on the main game board) to move this player's board to the top of player boards. This can reduce scrolling.
 In 3-player games, one of the spaces for tiles on depot 6 is half-green, half-grey. In phases A, C, and E, this space gets a castle tile. In phases B, and D, this space gets a mine tile.
Scoring/End of Game
The game ends after completion of the fifth phase. Players receive the following victory points:
- 1 point for each unsold goods tile
- 1 point for each remaining Silverling
- 1 point for every 2 workers
- Points according to placed yellow (knowledge) tiles
For ties, the player with the most* empty spaces on their board wins. If still tied, the player who went later in turn order wins.
The physical game's rulebook has an error in the English translation. It says, "In the case of a tie, the winning player is the tied player with the fewest empty estate spaces." This should be the opposite, as a player should be rewarded for having the most efficient duchy.
Tiles
Each tile triggers a different effect when placed.
 Animal: Player receives victory points according to how many animals of the same type are in the pasture (they do not need to be adjacent).
 Building (beige): Each building has a different effect, which is used immediately and only once. Only one of each type of building is allowed in each city (region of connected beige spaces). Mouse over each to see what they do.
  Castle: Gives player an immediate additional action.
  Mine: At the end of each phase, player receives 1 Silverling for each mine placed.
 Ship When placed, two things happen...
- Take all the goods tiles from any numbered depot and add them to your board.
- Move your player piece one space on the order track. This determines who starts in each round.
 Knowledge: Each knowledge tile gives a different effect for scoring victory points at game's end.
Bonus tiles
The first player to cover all spaces of one color in the entire estate takes the corresponding large bonus tile from the board and immediately scores points based on the number of players. The second player receives the smaller tile.
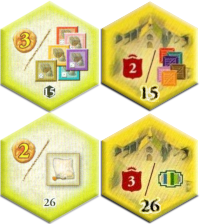
Differences Between First Edition and 2019 Edition
♦ Two of the yellow tiles ("knowledge tiles" in 1st edition, "monasteries" in 2019 edition) award a different number of points.
| 1st Edition | 2019 Edition | |
|---|---|---|
| #15 (Goods Variety) | 3 points for each type of good sold | 2 points for each type of good sold |
| #26 (Bonus Tiles) | 2 points for each bonus tile (large or small) | 3 points for each bonus tile (large or small) |
♦ The 2019 edition of yellow tile #6 adds the option of buying any tile from any depot (central or numbered) with either two Silverlings or two Workers.
♦ In the 2019 edition, you may buy a tile during your action.
♦ In the physical game, the 2019 edition includes an additional player board, labelled #2, and the board originally labelled #2 was renamed #10 in the 2019 edition (on BGA, it is #10 in both editions).
♦ Some terms were changed
- "Estate" was renamed to "Duchy"
- "Yellow tiles" were termed "Monasteries"
BGA Game Setup
On BGA, the default game mode is Random board without board #8 instead of Beginner setup. This is because beginners can be disadvantaged if they choose a poor space for their starting castle. Beginner setups do not allow a choice of castle placement (it's always in the center), which makes it a better choice for beginners.
- Classical: Each player is given a choice of two estate/duchy configurations. This simulates the physical game, where a player would be given a random two-sided player board and have the choice of which side to play. This means no players will have the same estate/duchy configuration.
- One random board per player: Each player is given a random duchy/estate. This means players might receive the same estate/duchy configuration.
- Random board without board 8: Same as "One random board per player", but board #8 is never selected as many players consider this board unbalanced.
- Identical (random) board for all players: All players play with the same randomly chosen board.
- Beginner setup: All players play with the same board with the first castle placed in the middle. The board may be #1, #2, or randomly chosen from between the two.